วันจันทร์ที่ 15 พฤศจิกายน พ.ศ. 2553

Project -> Overlay Disk Renew Machanism

รายงานสรุป
เรื่อง Overlay Disk Renew Machanism

จัดทำโดย
1.นางรุจรดา เย็นเยือก รหัส 5109035427
2.นายพิทักษ์ แท่นแก้ว รหัส 5209035194
3.นายวสันต์ กุลดิลก รหัส 5209035053

นำเสนอ
อาจารย์ ดร.กษิดิศ ชาญเชี่ยว

รายงานนี้เป็นส่วนหนึ่งของวิชา
CS797 Introduction to Computer Virtualizations เทอม 1/2553
ปริญญาโท ภาควิชาวิทยาการคอมพิวเตอร์
คณะวิทยาศาสตร์ มหาวิทยาลัยธรรมศาสตร์


Project 2 :: Overlay Disk Renew Mechanism1. To automatically use overlay disk image in KVM, users can invoke KVM
with the “-snapshot” option. In this project, you will add new capabilities to KVM disk emulation mechanisms to manage the above overlay disk.
In the current implementation of KVM, the overlay disk remain the same after users issue the “commit” command on qemu monitor to merge its contents to the base disk image. Therefore, as VM computation proceeds, the size of the overlay would grow bigger.
This project intends to modify the mechanism of KVM commit operation by
renewing the overlay disk after the merging of contents in the original commit
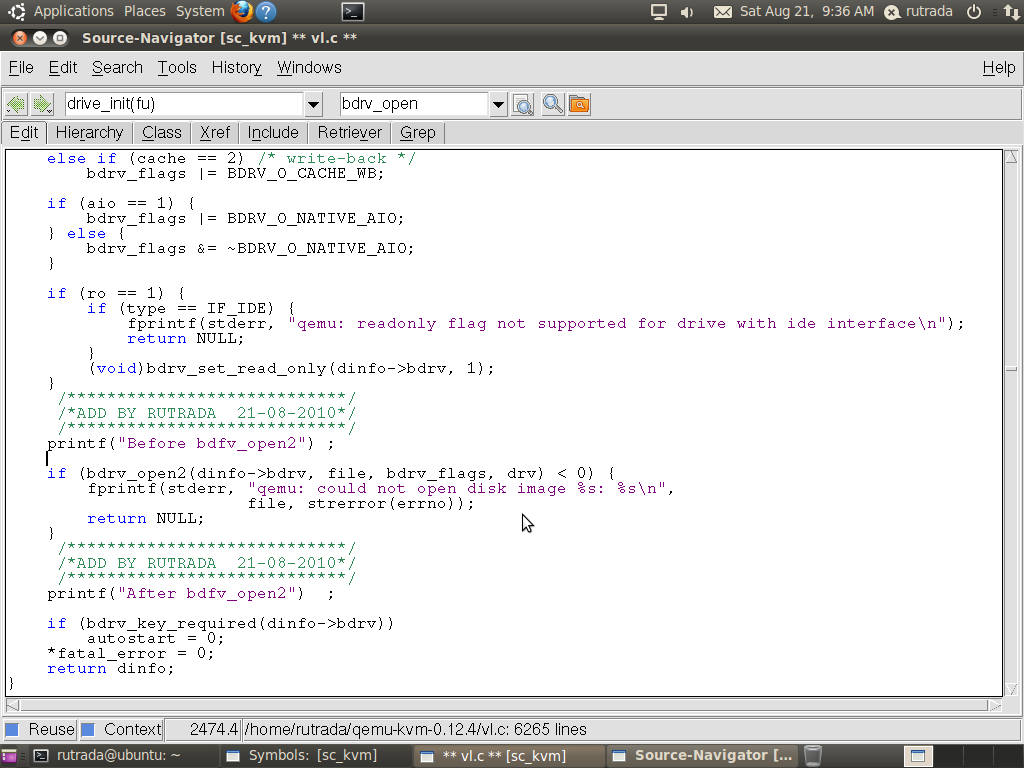
operation completes. You are required to create a new function namely the
bdrv_renew() to do the task. You are free to define any parameter for it.
This function would be called after the original commit operation is conducted.
To renew a disk, the bdrv_renew() function would create an empty overlay disk
on top of the base image that you have just committed contents to, and replace the
current overlay disk with the new one.
(The previous overlay disk must be deleted from host computers' file system.)

จากโจทย์ที่ได้รับ ได้ทำการแก้ไข Source-Code ในไฟล์
• 1.block.h
• 2.block.c
แสดงการทำงานด้วย Flow Chart ดังนี้


ทำการแก้ไข Source-Code
1. ทำการแก้ไข code ใน block.c เพื่อให้สามารถมองเห็นไฟล์ ที่ถูกสร้างขึ้นมา
ภายใต้ path file /tmp/…. จำนวน 3 จุดดังนี้ ที่บรรทัด 480 , 488 , 533
ตามภาพที่จะแสดงดังนี้


2. ในฟังก์ชั่น bdrv_commit()
ทำการสร้าง ฟังก์ชั่นใหม่ชื่อ bdrv_renew() แสดง source-code ตามรูปนี้


เพื่อให้ทำงานภายหลังจากการ Commit ให้ทำการเปิด Overlay Image ใหม่ ได้


3.ใน block.h ทำการเขียนประกาศโครงสร้างของฟังก์ใหม่ ตามรูปดังนี้
4.ใน bdrv_commit() ทำการเพิ่มฟังก์ชั่นการทำงานของ bdrv_renew()


สร้าง ovl ขึ้นมาใหม่ โดยอาศัย bdrv_renew() (ไปเรียกใช้ bdrv_open2()) ช่วยสร้าง snapshot ด้วยการกำหนดให้ flags มีค่า 72 ซึ่งได้จากการดำเนินการระดับ bit แบบ or ของค่าคงที่ BDRV_O_SNAPSHOT (0x0008) และ BDRV_O_CACHE_WB (0x0040) คำนวณแล้วได้ 0x0048 นั่นคือ 72 ฐาน 10 นั่นเอง
ทำการ Compile โปรแกรม ด้วยคำสั่ง
./configure
make
sudo make install

แสดงลำดับการทำงานดังนี้
1. Start Overlay Image
ด้วยคำสั่ง
Qemu-system-x86_64 –had had.img –m 256 –boot c –snapshot


2. จากคำสั่งนี้จะได้ไฟล์ vl.* มา ภายใต้ path file :/tmp/….
ตรวจสอบด้วยคำสั่ง
$ls –alh /tmp/vl.* (มี 1 ไฟล์)


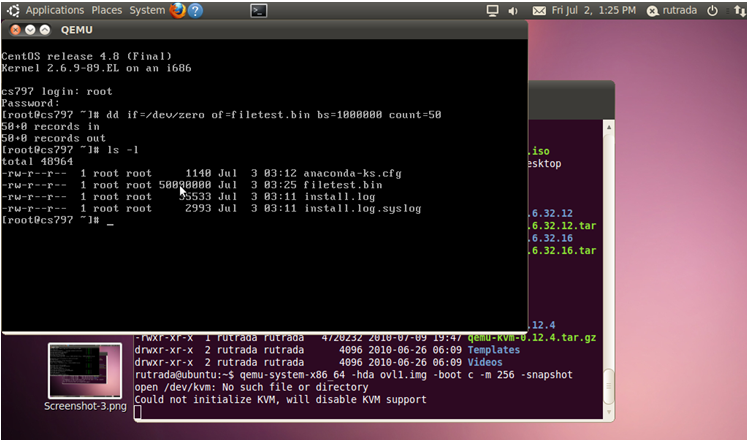
3. บน Guest OS ทดลองสร้างไฟล์ ขนาด 5 MB
ด้วยคำสั่ง
$dd if=/dev/zero of=test.img bs=1024 count=5
4. ทำการตรวจสอบขนาดไฟล์
ด้วยคำสั่ง $ls –alh /tmp/vl.* พบว่าไฟล์มีขนาดใหญ่ขึ้น

5.ทำการสลับ mode การทำงาน ใช้คำสั่ง
Ctrl + Alt + 2
แล้วพิมพ์คำสั่ง commit all


6. ทำการตรวจสอบไฟล์ vl.* ว่ามี 2 ไฟล์
ด้วยคำสั่ง $ls –alh /tmp/vl.*


7. ทำการตรวจสอบ base image ว่ามีขนาดใหญ่ขึ้น
ด้วยคำสั่ง $ls –alh hda.img (ไฟล์มีขนาดใหญ่ขึ้น 5 MB)


8. ที่ QEMU ทำการออกจากระบบ พิมพ์ Quit


9. พิมพ์คำสั่งที่ 1 อีกครั้ง (Start การทำงานของ VM อีกครั้ง) พบว่า test.img ยังอยู่


Conclusion and Future Work
>>ยังมี code ในส่วนฟังก์ชั่นการทำงานของ Undo ที่ต้องศึกษาต่อตามนี้\
แบบที่ 1
1.นับจำนวน sector ที่ต้องการจะเขียนไปที่ base file
2. เช็คค่าแต่ละ sector ว่ามีขนาดเท่าใด
3. ทำการเก็บเลข sector และขนาด
4. ทำการ Deallocated sector ต่างๆที่ได้ทำการ commit ไป ด้วยการตัด link-list
ที่ทำการเชื่อมในแต่ละ sector ที่ต่อกันออก แล้วชี้ไปที Sector สุดท้ายของ Base แทน เพื่อทำการจบ base file
แบบที่ 2
1. สำเนา base image ขึ้นมา 1 ชุด (เก็บไว้ใน directory backup)
2. ขณะ commit จะมี empty ovl เกิดขึ้นมา
3. จากนั้นทำการย้าย ovl ตัวเก่าไปเก็บไว้ที่ backup
4. สร้างไฟล์ log เก็บลำดับของ ovl ที่ได้ทำการ commit แล้ว (อาจมีการเก็บ timestamp)
5. การ commit ครั้งต่อ ๆ ไป ให้ดำเนินการตามข้อ 2. – 4.
6. เขียน script รับ input จากผู้ใช้ ระบุ เวลา/ลำดับ ของ base image ที่ต้องการ
7. วน loop เพื่อ ทยอย commit ทีละไฟล์ (เรียกใช้คำสั่ง qemu-img commit) ตามจำนวน input ของผู้ใช้
8. ผลที่ได้คือ base image ณ เวลา/ลำดับ ที่ผู้ใช้ต้องการ


Link for blog

วันอังคารที่ 5 ตุลาคม พ.ศ. 2553

CS797 Excercise 8 Study KVM internal 4

Virtual Machine migration.


Definition
Migration คือ การย้ายการทำงานจากเครื่องหนึ่งไปยังอีกเครื่องโดยสามารถทำงานต่อจาก State การทำงานเดิมที่ยังคงไว้ก่อนการทำ migration มีข้อดีคือ เสีย Down Time หรือ เวลาที่ระบบไม่สามารถให้บริการได้ น้อยที่สุดเท่าที่จะเป็นไปได้
 ตัวอย่างเช่น การให้บริการ web server หากต้องการทำการ Maintenance ระบบ โดยต้องมีการปิดเครื่อง Server จะทำให้ไม่สามารถให้บริการลูกค้าได้
 เราก็ทำการ Migration ระบบไปไว้ที่ Server อีกเครื่องก่อน เพื่อให้สามารถให้บริการ web server ได้ต่อไปโดยที่ผู้ใช้ไม่รู้สึกว่ามีอะไรเกิดขึ้นกับระบบ ส่วน Server เครื่องเดิมก็สามารถปิดเครื่องแล้วทำการ maintance ได้ เมื่อทำเสร็จแล้วจึงทำการ migration กลับมาที่เครื่องเดิมได้

Type of Migration
1. Quick Migration:
เป็นการ running state ที่ได้ทำการ saved ไว้ก่อนแล้วบน disk (hibernating the VM), หากเกิด disk failed ขณะทำการเคลื่อนย้ายข้ามเครื่อง จะทำการเรียก saved state ขึ้นมาทำงานต่อ (waking up the VM).
2. Offline Migration: เกิดขึ้นเมื่อทำการปิดระบบก่อนแล้วจึง migration จากเครื่องหนึ่งไปสู่อีกเครื่องหนึ่ง
3. Quick Storage Migration: เป็นการแทนที่การทำงานในโหมด Offline Migration โดยการ running VM สามารถเคลื่อนย้ายจาก host ไปสู่เครื่องอื่นได้ภายใน 2 นาที
4. Live Migration: เป็นกระบวนที่ทาการเคลื่อนย้าย virtual machine จากเครื่องหนึ่งไปยังอีกเครื่องหนึ่งโดยที่ไม่เกิดการ downtime ที่กระทบถึงระบบเน็ตเวิร์คหรือผู้ใช้

Algorithm of Live Migration

1. Migration Request arrives
2. Transfer Memory
3. Stop the VM
4. Transfer VM State
• Each device “transfer” its own state
• Dirty pages (from the last iteration) included
5. Continue the VM
• On remote (B) if migration was successful
• Send (broadcast) an Ethernet packet to announce the new location
• On local host (A) if migration failed


คำสั่งที่ใช้ Qemu monitor commands และ cmd line
- (qemu) migrate [–d]
On remote
-incoming
/usr/bin/kvm –m 512 –hda /images/a.img –incoming stdio
- (qemu) migrate_set_speed
- (qemu) migrate_cancel
- (qemu) info migration


วิธีการทำงานของ Live Migration


 จากรูปด้านบน เรามี 1 VM(virtual machine) ที่กำลัง running บน host 1.
ซึ่งจะประกอบด้วย 1 ส่วนที่เป็น configuration และอีก 1 ส่วนที่เป็น “state”.


 เมื่อเริ่มทำการ live migration
ส่วนที่เป็น configuration ของ VM จะถูก copied จาก host 1 ไปไว้ที่ VM ที่กำลัง running ที่ host 2,
ในที่นี้เป็น destination host. ซึ่งกำลังทำการสร้างตัวเองเป็น new VM.
ณ ตอนนี้ VM ยังคง running อยู่บนon host 1.


 ในขณะที่ VM ยังคง running อยู่บน host 1,
หน่วยความจำของ VM จะลดลงและถูก tracked ด้วยการใช้ bitmap.
แต่ละ page ที่จุดเริ่มต้นถูกเซตค่าเป็น clean.
ขณะที่ pages กำลังทำการ copied จาก VM ที่ยังคง Running อยู่บน host 1 ไปยัง new VM
ที่ถูกเขียนรออยู่ที่ host 2.

 ผู้ใช้งานและระบบ network applications ยังคงใช้การทำงานของ VM ที่อยู่บน host 1.ถ้ามีการเปลี่ยนแปลงของ RAM page ในขณะที่ running VM อยู่บน host 1 ภายหลังจากการ copied ไปที่ host 2 ระบบ OS จะทำการเปลี่ยน state จาก clean เป็น dirty. และทำซ้ำไปจนกระทั่ง ทำการ copied all pages จาก host 1 ไปสู่ host 2 และทุก State ถูกเซตค่าเป็น clean.


Summary Live Migration

1. When Starting , During Migration


2. When Finished Migration


CS797 Exercise 8 - PartII Virtual Machine Migration

1. Create Disk Image as qcow2 , assign the name is vm_des.img


2. Check disk image


3. Using port no : 1234 for Live Migration


4. Check Port No. 1234


5. Changed name of Terminal : Original


6. Changed name of Terminal : Destination


12. Migration


13.Check Status Migration


14. Finish


15. Finish Migration KVM


16. Original is Stop!


17. Destination is Running


Reference :
http://www.aidanfinn.com/?p=10109
http://knowlagecom.blogth.com/
http://www.linux-kvm.org/page/Migration
http://phithak.com/study-kvm-internal-4/comment-page-1
http://en.wikipedia.org/wiki/Kernel-based_Virtual_Machine
http://wiki.qemu.org/Main_Page


วันอังคารที่ 7 กันยายน พ.ศ. 2553

CS797 Excercise 7 Study KVM internal 3

1. Explain the following functions and insert printf() statements (or use
debuggers) to trace their operations:
- bdrv_read()
- bdrv_write()
- do_commit()
and bdrv_commit


2. Find out 'WHEN” and “WHERE” the bdrv_read() and bdrv_write() function
get called


References:
1. http://sourcenav.sourceforge.net/
2. www.linux-kvm.org
3. http://en.wikipedia.org/wiki/Kernel-based_Virtual_Machine
4. http://wiki.qemu.org/Main_Page

วันเสาร์ที่ 28 สิงหาคม พ.ศ. 2553

CS797 Excercise 6 Study KVM internal 2

1. What does the constructor do for the following block_init (defined in
module.h) calls
block_init(bdrv_qcow2_init) in block/qcow2.c
block_init(bdrv_raw_init) in block/raw-posix.c
>> do_qemu_init_ ## function
>>module.h call three function
#define block_init(function) module_init(function, MODULE_INIT_BLOCK)
#define device_init(function) module_init(function, MODULE_INIT_DEVICE)
#define machine_init(function) module_init(function, MODULE_INIT_MACHINE)


2. Study and describe data structures related to
bdrv_open()

>> ฟังก์ชั่น bdrv_open(parameter) เรียกใช้ parameter 3 ตัว ได้แก่
BlockDriverState *bs, const char *filename, int flags, BlockDriver *drv
>> ฟังก์ชั่น bdrv_close(parameter) เรียกใช้ parameter 1 ตัว
BlockDriverState *bs Detail of Data Structure:: Show Struct and Pointer In Code :: block_int.h

Also, draw links between these data structures


3. Find out 'WHEN” and “WHERE” the bdrv_open() function is called
4. Draw the function call graph for the bdrv_open() function

>> bdrv_open() -->> bdrv_open2() -->>qcow_open()
-----pending ----Now has error in some files


5. Describe what happen to the data structure in 2) when the bdrv_open()
function is called to open an overlay hard disk image
-----pending ----Now has error in some files


References:
1. http://sourcenav.sourceforge.net/

CS797 Excercise 5 Study KVM internal 1

1. You may want to install source navigator [1] software on your computer tohelp analyze the KVM source code [2][3][4]. If you want to use any other software, that is fine too. The uses of source navigator is not required.

# -ทำการติดตั้งโปรแกรม Source-Navigator บน Ubuntu [Base OS] ด้วยคำสั่ง
- $ tar xjf sourcenavigator-NG.tar.bz2
- $ cd sourcenavigator-NG
- $ ./configure
- $ make
- $ sudo make install

# -ทำการ Create Project แล้วค่าเชตให้ Path File ชี้ไปที่ QEMU-KVM ที่ติดตั้งจาก Exercise ก่อนหน้านี้


2. Study the file vl.c and describe what happen when KVM detect “-hda” option.
# ทำการเปิดไฟล์ vl.c

# ทำการค้นหาคา –hda จากเมนู Search

# แสดงบรรทัดที่เจอ –hda ซึ่งเป็นคาสั่งที่ทาการเรียก drive_add()

3. Also, answer which function read the “-hda” option string?
# ทำการค้นหา –hda ในรูปแบบ string ,พบว่าเป็นการเรียก function drive_add ()
# แสดงบรรทัดที่เจอ “hda”
4. Draw function call graph involving the “-hda” option as deep as you can and describe the functions in the graph.
# QEMU_OPTION_hda ทาการเรียกฟังก์ชั่น qemu-options.h


5. The three important functions that control KVM operations are main(),main_loop(), and main_loop_wait().
What do you think these function do? Use your best educated guest. (I don't expect the exact answer, but I want to hear your ideas.)

a) main() : ทำหน้าที่เป็น Main Program
int main(int argc, char **argv, ;char **envp)
{ const char *gdbstub_dev = NULL;
uint32_t boot_devices_bitmap = 0;


main_loop();
quit_timers();
net_cleanup();

return 0;
}

b) main_loop() : จะถูกเรียกใช้ต่อจาก main()
แล้วทำการเรียก kvm_main_loop()

static void main_loop(void)
{ int r;
if (kvm_enabled())
{ kvm_main_loop();
cpu_disable_ticks();
return; }
แล้วภายใน kvm_main_loop()
การเรียก main_loop_wait()

c) main_loop_wait(). : ทำงานต่อจาก main_loop() เรียกใช้งานเกี่ยวกับเวลา
void main_loop_wait(int timeout)
{ ...
qemu_bh_update_timeout(&timeout);
host_main_loop_wait(&timeout);
qemu_mutex_unlock_iothread();
...
}


6. Study the “bdrv_open()” function and describe what you think the function is for.
# ทำการเรียก function bdrv_open2(bs,filename,flags,NULL);

7. Insert two “printf” statements at beginning and end of “bdrv_open()” function call and describe what you see when the you call KVM using “base-OSimage.img” versus using “myoverlay2.ovl” (from Exercise 4) as the hda disk.What are the different and why so?

# ทำการเพิ่ม code เพื่อแสดงข้อความก่อนเรียกใช้ Function และหลังเรียกใช้ฟังก์ชั่น


a) ทำการเรียกใช้ฟังก์ชั่น จาก “base-OS image.img”


b) ทำการเรียกใช้ฟังก์ชั่น จาก “myoverlay2.ovl” (from Exercise 4)
มีการเรียก


c)

Show Difference
ที่ BASE image ทาการเรียกใช้ bdrv_open2 = 8 ครั้ง

1>>2>>3,4 5>> 6>>7,8


ที่ Overlay image ทาการเรียกใช้ bdrv_open2 = 14 ครั้ง

1>>2>>3,4 >>5>>6,7 >>8 >>9>>10,11 >>12>>13,14


References:
1. http://sourcenav.sourceforge.net/

วันพฤหัสบดีที่ 15 กรกฎาคม พ.ศ. 2553

CS797 Exercise 4 : KVM Overlay Image

Exercise 4 : KVM using Overlay
1.install CentOS as Guest OS

2. ทำการสร้าง BASE image จะใช้เป็น Back up files
ด้วยคำสั่ง qemu-img create –f qcow2 ovl1.img 4G

3. ทำการ start จาก overlay image 1
ด้วยคำสั่ง qemu-system-x86_64 -had ovl1.img -boot c -m 256 -snapshot


4. แล้วใช้คำสั่ง commit all แล้วกด Ctrl + Alt + 2 เพื่อสลับการทำงานไปที่ KVM mode
5. แล้วทำการสร้าง file ชื่อว่า test.bin ให้มีขนาด 50k
6.ทำการแสดงขนาดของ overlay img

7.แล้วออกจากการทำงาน ด้วยคำสั่ง q


8. ทำการสร้าง overlay image ตัวที่ 2
ด้วยคำสั่ง qemu-img create –f qcow2 ovl2.img 4G

9. ทำการ start จาก overlay image 1
ด้วยคำสั่ง qemu-system-x86_64 -had ovl2.img -boot c -m 256 -snapshot


10. ทำการเช็ค file เปรียบเทียบ overlay image ทั้ง 2 ตัว จะพบว่าที่ overlay1 จะยังคงมี files ชื่อว่า filetest.bin อยู่ ส่วนที่ overlay image2 จะไม่มี file นี้อยู่