1. Install vmware on your computer
2. Install Ubuntu on your vmware virtual machine
3. Obtain KVM source code from KVM web site (sourceforge.net)
4. Compile KVM source code and install them on your Ubuntu OS
5. Search the Internet for guideline to compile and install KVM
6. Use the “qemu-img” command (at command line) to create your virtual disk in
the “qcow2” format
7. Download the Damn Small Linux iso image on your Ubuntu
8. Use command line _______________________ to run your KVM and install
Damn Small Linux (DSL) on the virtual disk you just created
9. Take snapshots of the screen showing
◦ Your KVM compilation
◦ The command line used to run KVM from Ubuntu
++++++++++++++++++++++++++++++++++++++++++++++++++++++++++++++++++++++++++++++++
จากการบ้าน ex1 ได้ทำข้อ 1 และ 2 ไปแล้ว และที่การ install KVM บน Ubuntu ไปแล้ว แต่สำหรับครั้งนี้เราจะทำการ remove KVM ออกก่อน แล้วค่อยทำข้อ 3 – 8
Step 1 ทำการ remove KVM

Step 2 Install Program for Compile Source Code


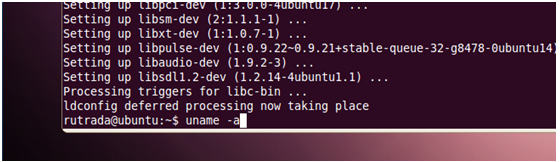
Step 4 Check Version of Kernel ของ Ubuntu
With command : uname -a


Step 5 Unpacking and Configuring
- ดาวน์โหลด kvm-kmod-2.6.32.16 จาก http://sourceforge.net/projects/kvm/files/ และทำการ extract
$ bunzip2 kvm-kmod-2.6.32.16.tar.bz2
$ tar xvf kvm-kmod-2.6.32.16.tar
$ cd kvm-kmod-2.6.32.16
- Compile และ Install
$ ./configure
$ make
$ sudo make install

Step 5 ทำการ Reboot เครื่อง

- เปิด Terminal แล้วพิมพ์คำสั่ง เพื่อ add module ให้กับ kernel
$ sudo /sbin/modprobe kvm-intel

Step 6 qemu-kvm
- ดาวน์โหลด qemu-kvm-0.12.4 จาก http://sourceforge.net/projects/kvm/files/ และทำการ extract
$ tar xvfz qemu-kvm-0.12.4.tar.gz
$ cd qemu-kvm-0.12.4
- Compile และ Install (ติดตั้งไว้ที่ /opt/kvm)
$ ./configure --prefix=/opt/kvm
$ make
$ sudo make install


Step 7 Creating a disk image for the guest
with command :
$ /opt/kvm/bin/qemu-img create -f qcow2 hda.img 3G

Installing DSL (Damn Small Linux)
ติดตั้งลงบน disk image ที่สร้างไว้ (hda.img) โดยใช้ตัวติดตั้งจาก DSL iso ที่ดาวน์โหลดมา
With command :
$ /opt/kvm/bin/qemu-system-x86_64 -hda hda.img -cdrom dsl-4.4.10.iso -boot d -m 256


With command : uname -a

Step 5 Unpacking and Configuring
- ดาวน์โหลด kvm-kmod-2.6.32.16 จาก http://sourceforge.net/projects/kvm/files/ และทำการ extract
$ bunzip2 kvm-kmod-2.6.32.16.tar.bz2
$ tar xvf kvm-kmod-2.6.32.16.tar
$ cd kvm-kmod-2.6.32.16
- Compile และ Install
$ ./configure
$ make
$ sudo make install

Step 5 ทำการ Reboot เครื่อง

- เปิด Terminal แล้วพิมพ์คำสั่ง เพื่อ add module ให้กับ kernel
$ sudo /sbin/modprobe kvm-intel

Step 6 qemu-kvm
- ดาวน์โหลด qemu-kvm-0.12.4 จาก http://sourceforge.net/projects/kvm/files/ และทำการ extract
$ tar xvfz qemu-kvm-0.12.4.tar.gz
$ cd qemu-kvm-0.12.4
- Compile และ Install (ติดตั้งไว้ที่ /opt/kvm)
$ ./configure --prefix=/opt/kvm
$ make
$ sudo make install


Step 7 Creating a disk image for the guest
with command :
$ /opt/kvm/bin/qemu-img create -f qcow2 hda.img 3G

Installing DSL (Damn Small Linux)
ติดตั้งลงบน disk image ที่สร้างไว้ (hda.img) โดยใช้ตัวติดตั้งจาก DSL iso ที่ดาวน์โหลดมา
With command :
$ /opt/kvm/bin/qemu-system-x86_64 -hda hda.img -cdrom dsl-4.4.10.iso -boot d -m 256


ไม่มีความคิดเห็น:
แสดงความคิดเห็น